Blogging

Lightroom Keyword List by Harold Brown

If you have been considering Adobe's Lightroom or have Lightroom you will probably want to take advantage of the Keyword List that is made available to you. If you are like me, you are probably wondering where to start. Once you figure out where to start you need to figure out where you end it as well. In this post I will review my Keyword List and how I arrived at the list I created.

The first thing to consider is what is important to you. For example I like to identify all my family and friends in my photos. That helps me locate pictures of them very quickly. So I created a high level keyword "People", and under "People" I create two keyword tags called "Family" and the second called "Friends". Everyone's name that I add either appears under "Family" or "Friends". If they don't fit into these two categories I just add the name under "People". For example I have several photos with Desmond Tutu in them. He isn't family nor a friend so I placed his name under "People". The format that I use is "Last Name First Name". Example; "Tutu Desmond". Just a space separates the last name from the first name. I use the last name first so family members group together.
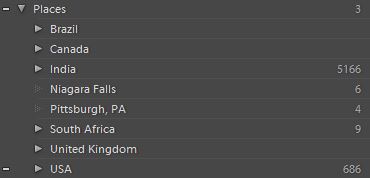
Places KeywordsThe second keyword I created was "Places". I like to keep track of where I have been and where the picture was taken. I do this via GEO Tagging and keywords. Under Places I create keywords for each country I have pictures from, and within country I have States, Providences or regions. Typically at the lowest level is the city or possibly a state park. In the photo to the left you will see the high level structure. You can also see that I have a couple of keywords remaining that I created before I put in the final structure I described. It is very easy to get the remaining pictures in the correct keyword list. Since many of my pictures are published to my website via Lightroom it does require me to republish the pictures which Lightroom makes very easy.

Transportation KeywordA third keyword grouping I created is called "Transportation". I have created a keyword for everything that I have a picture of including an ox cart. I don't track information on sedan or coupe, nor do I keep track of motor size. I try to go down to the model level if I know it otherwise I go up a level. The picture on the left shows you a break down on a few of my keywords under "Transportation". Independent of "Transportation" I have individual keywords for each of the cars I have owned. So I am able to call up every picture I have of my 1964 Chevy Belair. Keyword "1964 Chevy BelAir".

The other main Keyword List that I have is "Wildlife". Under wildlife I have Birds, "Bugs and Insects", Domesticated, Fish, Mammals, and "Reptiles and Amphibians". Man is not an animal nor would I consider him wildlife. They appear under "People".

I also have a Keyword List for "Flowers & Plants" but it isn't as large as the others. Mainly because I don't know all the names of the various plants and I haven't decided to take up learning all of that.

I do have a few other smaller Keyword Lists for Season, Weather, Weddings, and Style (landscape, panorama, aerial), Time, Water (Bay, Creek, River, Fountain, Lagoon, etc).

As I mentioned you can take keywords too far, but you need to consider how you might want to locate one of your favorite photos. In my Lightroom catalog I have 39,604 photographs that span over 50 years. I need good keywords to help me locate what I want. After that it is about discipline and adding the keywords to your photographs, or creating new ones.

Please comment below if you want to share your Keyword List strategy.

Get out and see the world, and take a picture while you are at it.

Photoshop Shake Reduction by Harold Brown

In November of 2012 I posted about not deleting your pictures if they are not in perfect focus. Some bloggers/experts recommended that you delete them, while I suggested that you do not know what will be possible in the future. Well the future is here. Photoshop Shake Reduction will be available in June of this year. Checkout the video below. I have a few pictures that meet this criteria waiting on me to apply the fix. I am sure this feature will continue to get better and would work great on my type of photography which is run and gun. I have a lot of photos that I have taken from moving cars and auto rickswaws that this might really help. [color-button color=orange href="http://bhagavideo.com/2012/11/the-future-of-photography-technology/"]See my post "The Future of Photography Technology"[/color-button]

Want to learn more about Shake Reduction?

Adobe Shake Reduction Checkout the Adobe Blog

Checkout Terry White's Blog

Surat Gujarat India by Harold Brown

Surat Gujarat India

In 2010 my wife and I visited her ancestral home in Gujarat, India. We had traveled their with her sister's family to visit friends and family. One day we decided to drive the ladies to Surat, and spend the day their shopping at some of the stores. If you have never been to India you don't know what you are missing. I enjoy travel, and seeing new things and experiencing life in other areas of the world. So a trip to India was fantastic. If you have not been there the below short 51 second video was filmed through the wind screen of the car with my Nikon D90.  Note that center lanes and driving rules and laws only semi apply in India, but it is getting better I hear.

Driving to Surat, Gujarat, India in HD


Near the Maroli Sugar Factory

Old Surat Mumbai Highway
Surat Gujarat India

Ox Cart carrying sugar cane


Notice below the name on the shirt

Surat Gujarat India
Harold Brown Travel Photography

G3 Fashions was the ladies store of choice so we headed there. In the below video, the ladies shop for sarees. Note the number of saris they are looking at and the patience of the clerks. This is only 36 seconds of a very long process, but success, they did find what they were looking for.

Shopping for sarees at G3 Fashions

Surat Gujarat India

In India, sarees are worn by ladies at weddings, festivals, parties & social occasions.

Athwalines, Surat India

After a long day of shopping we headed to shopping beneath the main roads reminiscent of Underground Atlanta. Everything imaginable could be found in the area, it was cramped and motor cycles wound their way around display tables and people. Something you would not see here in the US.

I shot the below video on my D90 through the windshield of our car as we waited on Janti and Aruna to finish a last minute purchase (the shopping area we were at was below the street level of this video).

Ready to head back to Navsari from a day of shopping in Surat

Surat Gujarat India
 

Spring 2013 by Harold Brown

Well it  is that time of year when we start to see the trees start to turn green again and the tulips begin to appear and the Robin returns from the south. Here are a few pictures from the past that will get us in the Spring of things. Click on the picture and then click on "play slideshow" to see the photos.

Spring 2013

Spring 2013

Spring 2013

Spring 2013

Spring 2013

Spring 2013

[mapsmarker marker="12"]

Scanning Negatives on the Epson V700 by Harold Brown

Bhaga Video | Harold Brown

I have been using my Epson V700 to scan slides for the past couple of months. I wrote a review of the scanner about 2 months ago. If you want to read the original article click here. I scanned a few pictures for that post on the V700 scanner, but not any negatives. Scanning negatives was one of the primary reasons I bought the V700 Photo Scanner so I figured I best get at it! Many people have stated that the negative holders feel cheap or flimsy, and I guess they do compared to the slide holder. So when loading in negatives make sure that you take your time and work on a flat surface. That should help prevent any damage from occurring.

The first negatives I scanned were the first ones I found in my storage compartment. I reached in and took out some of the envelopes and stopped at the first one that also contained the negatives. That turned out to be from a work Christmas party in December 1983. So they were just over 29 years old. The prints were stored with them and I did remember correctly that the color of the prints was muted and not very vibrant. I like my pictures to pop a little more so I was going to have to fix that. The negatives were in good condition, meaning never handled, stored in a dry place and flat, not curled.

The film was taken to a local drug store for processing on Dec 26, 1983 and was Kodak Kodacolor VR 100 (the label on the film is KODAK CP 100). The film was cut into strips of 4 and the Epson negative holders can hold a strip of 6. So that wasn't going to be a problem. When handling the film I used cotton gloves, and after mounting the negatives into the holder (KODAK CP 100 facing down towards the flatbed) I sprayed them with a compressed gas duster as the only cleaning I did. I then turned the scanner on and started SilverFast 8. From the research that I did and the few days that I used the demo software, I decided that SilverFast was the way to go for me. I really do not care about ease of use because what I need is something that works, not something that is easy. Believe me, SilverFast is much easier to learn than Photoshop. I was able to become comfortable with SilverFast in about 3 days working a couple hours each day. Since then, each day builds on the previous and now I am learning additional info about Silverfast at my leisure.

I scanned the first batch of negatives manually, and the second batch using the automatic features of SilverFast. In this case I found the automatic processing to do a very good job. I was happy with it, but of course nothing escapes Lightroom and Photoshop for the final result. I do not add sharpening during the scanning process. I save that for the processing I do in LR and PS. This post is really about the V700 and not any software that I use with it, so I will say that SilverFast has the CP 100 negative type film that I can select to tell it what type of film is being scanned.

Scanning Negatives on the Epson V700

What I found is that the final image from the scanned negatives look good, were well received when I shared them with my friends, and some were surprised that I had scanned them from negatives and not the actual print itself. As typical, the scanned negatives were a little soft on focus, but could be adjusted to a sharper image if necessary. Just be careful not to add too much, it is best to keep people on the softer side of a focus anyway! Many times I adjust a pictures lightness and darkness based on a person's hair. Trying to make sure it has some detail and the shading looks good. Skin tones needing to be correct is a no brainer so don't miss the boat there.

They say a picture is worth a thousand words, so here are some pictures that illustrate what I have discussed above.

Picture adjusted for exposure, color noise, and dust and dirt on negative

Notice how the details of the blouse are brought out perfectly and the skin tones are pleasant as well. Just a little rosy color on the cheeks.

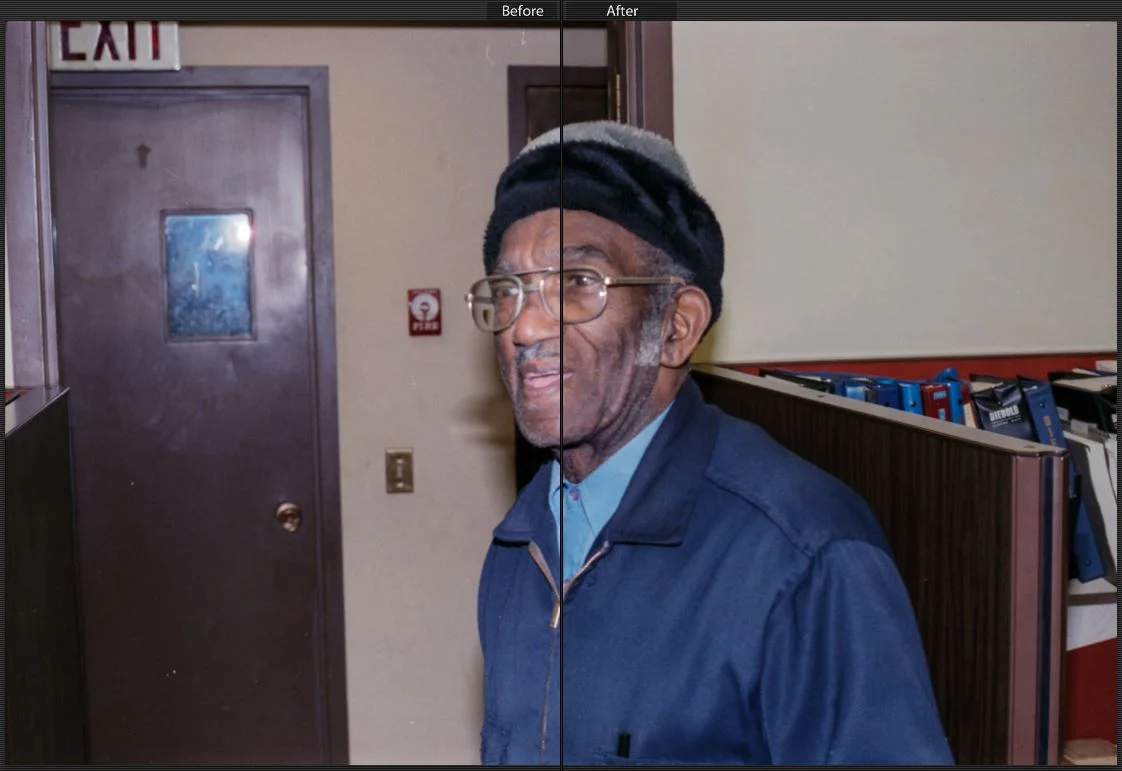
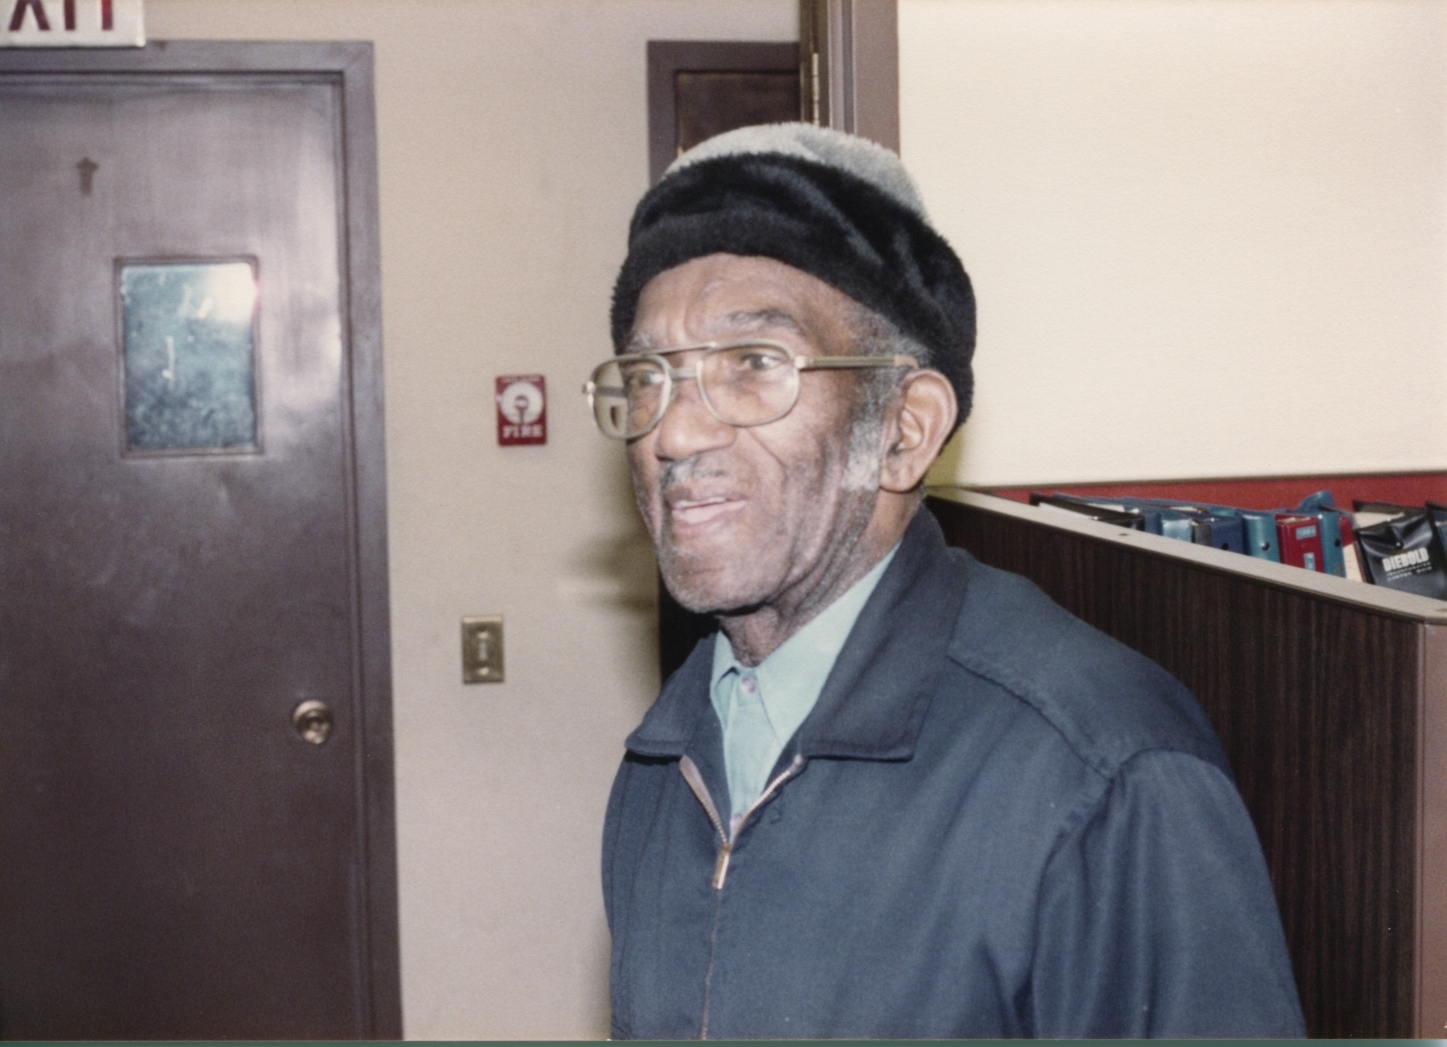
The next set of pictures shows the before and after scanned negative of Mr. Hunter as well as the scanned version of the actual picture from 1983. When scanning a picture you need to replace the white insert into the lid of the scanner (reflective scanning).

Scanning Negatives on the Epson V700
Side by side comparison in LR of the scanned negative
The colors in this picture are as printed in 1983

Naturally the above scanned photo could have color correction applied and the colors from the negative versions would be similar. The negatives were scanned at 3,200DPI and larger versions of the picture look very good.

Note: The scanned negative contained more information that what was actually printed in the picture in 1983. In this case the negative scan brought in more information which made a difference on many of the other prints from this set.

Hopefully the above information has been useful or has inspired you to scan in some of your old photographs and share them digitally with your friends.