Scanning Negatives on the Epson V700

I have been using my Epson V700 to scan slides for the past couple of months. I wrote a review of the scanner about 2 months ago. If you want to read the original article click here. I scanned a few pictures for that post on the V700 scanner, but not any negatives. Scanning negatives was one of the primary reasons I bought the V700 Photo Scanner so I figured I best get at it! Many people have stated that the negative holders feel cheap or flimsy, and I guess they do compared to the slide holder. So when loading in negatives make sure that you take your time and work on a flat surface. That should help prevent any damage from occurring.
The first negatives I scanned were the first ones I found in my storage compartment. I reached in and took out some of the envelopes and stopped at the first one that also contained the negatives. That turned out to be from a work Christmas party in December 1983. So they were just over 29 years old. The prints were stored with them and I did remember correctly that the color of the prints was muted and not very vibrant. I like my pictures to pop a little more so I was going to have to fix that. The negatives were in good condition, meaning never handled, stored in a dry place and flat, not curled.
The film was taken to a local drug store for processing on Dec 26, 1983 and was Kodak Kodacolor VR 100 (the label on the film is KODAK CP 100). The film was cut into strips of 4 and the Epson negative holders can hold a strip of 6. So that wasn't going to be a problem. When handling the film I used cotton gloves, and after mounting the negatives into the holder (KODAK CP 100 facing down towards the flatbed) I sprayed them with a compressed gas duster as the only cleaning I did. I then turned the scanner on and started SilverFast 8. From the research that I did and the few days that I used the demo software, I decided that SilverFast was the way to go for me. I really do not care about ease of use because what I need is something that works, not something that is easy. Believe me, SilverFast is much easier to learn than Photoshop. I was able to become comfortable with SilverFast in about 3 days working a couple hours each day. Since then, each day builds on the previous and now I am learning additional info about Silverfast at my leisure.
I scanned the first batch of negatives manually, and the second batch using the automatic features of SilverFast. In this case I found the automatic processing to do a very good job. I was happy with it, but of course nothing escapes Lightroom and Photoshop for the final result. I do not add sharpening during the scanning process. I save that for the processing I do in LR and PS. This post is really about the V700 and not any software that I use with it, so I will say that SilverFast has the CP 100 negative type film that I can select to tell it what type of film is being scanned.

What I found is that the final image from the scanned negatives look good, were well received when I shared them with my friends, and some were surprised that I had scanned them from negatives and not the actual print itself. As typical, the scanned negatives were a little soft on focus, but could be adjusted to a sharper image if necessary. Just be careful not to add too much, it is best to keep people on the softer side of a focus anyway! Many times I adjust a pictures lightness and darkness based on a person's hair. Trying to make sure it has some detail and the shading looks good. Skin tones needing to be correct is a no brainer so don't miss the boat there.
They say a picture is worth a thousand words, so here are some pictures that illustrate what I have discussed above.

Notice how the details of the blouse are brought out perfectly and the skin tones are pleasant as well. Just a little rosy color on the cheeks.
The next set of pictures shows the before and after scanned negative of Mr. Hunter as well as the scanned version of the actual picture from 1983. When scanning a picture you need to replace the white insert into the lid of the scanner (reflective scanning).


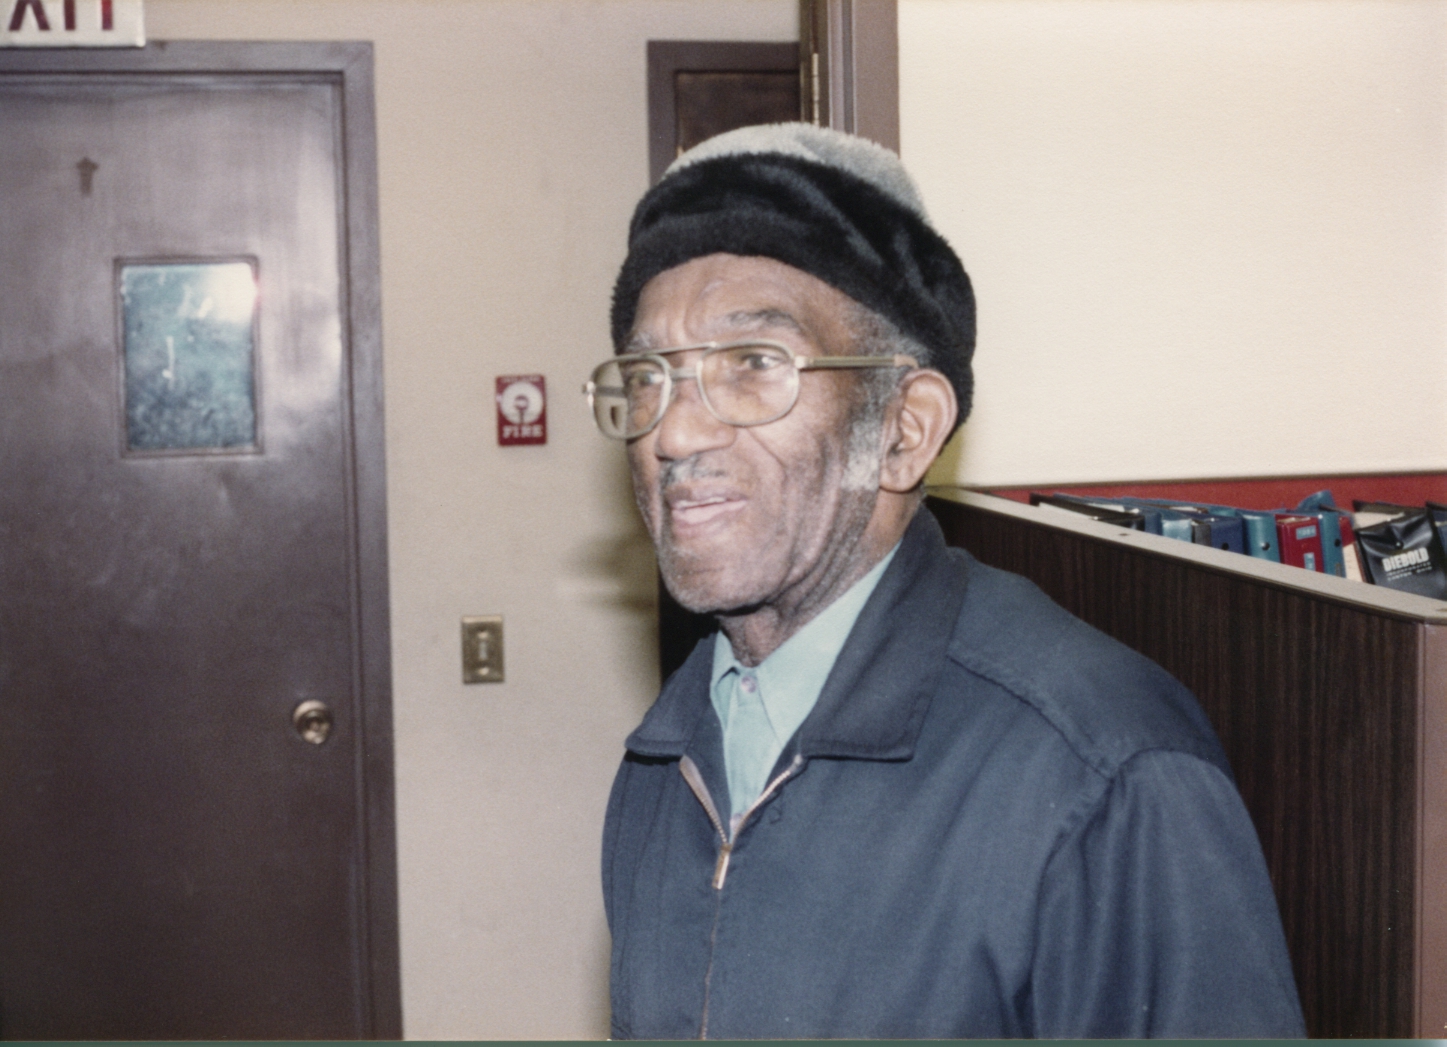
Naturally the above scanned photo could have color correction applied and the colors from the negative versions would be similar. The negatives were scanned at 3,200DPI and larger versions of the picture look very good.
Note: The scanned negative contained more information that what was actually printed in the picture in 1983. In this case the negative scan brought in more information which made a difference on many of the other prints from this set.
Hopefully the above information has been useful or has inspired you to scan in some of your old photographs and share them digitally with your friends.
WordPress Website Overhaul Part 1
![]()
I have completed my WordPress Website Overhaul and it was well worth the time that it took. This post is more about approach, but part 2 will contain more information on the plugins that I use. BhagaVideo.com is a self hosted WordPress site that makes use of many plugins. When I started the overhaul, my site load times were running in the 5 seconds area and I really wasn't happy with the overall look and feel of the site. I mostly do video and photography for fun and blog about my travels both near and far. Through this website I encourage others to digitize and restore their old photos and document their travels.

My photo website is Photos.BhagaVideo.com and it contains 6,000 pictures that I have taken since I was 10 years old. Most of the pictures are available for public viewing and many others are in private albums. The two sites contain links between them, with most of the pictures in my blog originate from the photo site. My photo site is hosted by SmugMug.
Before using WordPress I was writing my own code, but decided that I wanted my site to be more of a blog and WP seemed like a good way to go. I have used many themes trying each one out but was never really satisfied. One of my requirements for my photo site was GEO Mapping of my pictures, yet my blog did not make use of that. That didn't make sense. So I started looking at themes and came across Travel Blogger. Its theme was travel and it had Google Maps functionality built in. A perfect compliment to my photo site. I installed the Theme and made the adjustments to the size of the columns using a slider provided by the Theme. If your blog is about cruising they have a Theme entitled "Seaward Bound" there is also a NYC Theme. Check them out.
Once I installed the theme I had the option of adding maps to all of my posts. I went back through my older posts and updated them to include a Google Map where that made sense to do. That is as simple as adding the shortcode to the end of my post. I only had about 50 posts that I needed to review so for me this wasn't a daunting task.
The second task was to review all of the Pages for content. I needed to update them to emphasize the travel focus of my site as well as still providing the inspiration around capturing old photos and converting 8mm film to video. This isn't exciting work but I believe that your site should have some consistency to it and stick to the theme.
The third task was to look at all of the plugins that I had installed and decide which ones I really didn't need, want or were overlapped by another plugin. You can get pretty hung up on cool thinks that really doesn't matter to anyone, and just adds to the load time of your site.

If you are going to run stats on your site pick the one that you like and go with it. I had Google Analytics, "Visitor Maps and Who's Online", and Woopra. I like Woopra but it really didn't give me anything more than what I can get with Google and the live chat isn't something that I will be doing. The most visitors I have ever had at one time is 26 and almost no one leaves a comment so what is the point? Worth considering if you are spending a lot more time on your site. "Visitor Maps and Who's Online" is something I like as well and the map of the world is great, but at the end of the day it is something I like and nothing my visitors really care about. The Who's online is good but again Google Analytics has it covered. It is a great option for anyone who wants to disconnect themselves from Google. I run Google Analytics on my photo website so I decided to go with Google Analytics and deleted the other 2 plugins. My first victory!
The next to go was copyrightpro. It works very well, but nothing on my site is worth protecting so again I had to ask myself, what's the point? It is just adding to the load time of my site, so deactivated and deleted. Next was Google Fonts, I wasn't using the plugin and I don't see a need to ever use it. I want to keep my site cleaner looking without a lot of colors and differing fonts.
I suggest that you follow the same idea that I did and delete the plugins that you no longer use or care about. The search engines are looking at your sites load time to improve its ranking so it is best to make site speed your priority rather than plugins that don't bring value to your visitors or you. The net result of doing the above dropped a full 1.5 seconds off the load time of my site. Well worth the effort that I made.
Look for part 2 of my overhaul post. I will get more into the plugins I decided on keeping and how I decided what to get rid of or replace.
Please feel free to comment below. Registration not required!
Merry Christmas 2012
Merry Christmas to everyone, hope your holidays are filled with joy and may you have great happiness in the New Year. Here are a few pictures of our Christmas this year.


A Couple of Scary Halloween Photos
Halloween 2012 is over but it isn't too late to post a couple of scary photos taken at the local garden center. A few tweaks here and there and lose the boring. Skeletons are my favorite Halloween characters, you can wrap them up in anything, dim the lights and scare anyone that comes along! We don't do any decorating for Halloween at home, but we are always there to hand out candy to all those that dress up!

It was daylight when I took the above picture but after making a few adjustments the picture has a lot more character. One worthy of the subjects in the photo.

Was the bride left at the alter? I wouldn't have showed up for this one either!

I have some great shots of the cat sleeping in a card board box (the one he is sitting in above). Looked like a coffin and perhaps he was a vampire cat. I saved the pictures for another time. Perhaps next year.
[mapsmarker marker="21"]
The Future of Photography Technology
The future of photography technology will be as dramatic as the technologies we are seeing in smartphones and tablets. The computing power is doubling at amazing rates and the power needed to manipulate photographs is growing with it. That is so promising and yet not everyone has grasped that yet. I was reading an article about organizing your photographs and the author said to not download your blurry photographs. Stop right there! That statement is assuming a lot of things that are not necessarily true. First, it assumes that the picture is just one of many and no big deal if you delete it. Second, it also assumes that at no time in the future could technology advancements in photography resolve the blur problem. Because of better technology I have pictures that I have rescued this past year that I took 12 years ago. If that blurry image is the only one you have of something important then do not delete it! Have you seen the technology demonstrated by Adobe where blurry images are being corrected to an almost perfect image? I only delete pictures that I feel are duplicates and of no value regardless of the future. Yes, I have a lot more pictures I store because of that but so what? What is the cost of doing that?
Be very selective of the pictures you delete. I have gone back into my archived pictures more than once to process a picture because of what was in the photograph. I used 12 year old pictures of my house being built to see where the pipes and wires were at. I didn't have them in my "official albums" but they were still there on my hard drive. You never know what the value of a picture is until the day you want it or wish you had it.
I store all of my photographs on a single drive that is backed up by Carbonite and I also copy the "Picture" directory to a second hard drive. I do not want to lose my pictures regardless of their perfection.
Checkout the Adobe "Sneak".
Perigee Moon Picture

Over the years I have pointed my camera to the night sky to capture a picture of the moon. It always looks so great in the motion picture world. Unfortunately not so easy to capture in real life. I was a kid in the sixties following the space program and the Moon had special interest to me. So finally last year I decided that I want to take a good picture of the moon. It was a Super Moon and what better time to take a picture.
So I put the 70-300mm lens on my Nikon D90, went onto my deck, setup my tripod and took pictures at various exposure times. My best shot was at 1/4000 second at f5.6 and ISO 200. Then some Photoshop work to get a cleaner picture.
The Moon is about 31,069 miles, closer to Earth and therefore is bigger and brighter than the usual full moon.

Thanks for visiting our blog. We hope you will find our site informative or inspiring. Whichever, get out and take some pictures.
Harold & Geet
Pictures on Flickr